Everything required to reproduce the results is made accessible. In the following steps we explain first how to obtain access to the three big software packages (ROS, Gazebo and Tensorflow) with the use of docker. Second, we go over the installation of small packages locally from within a docker container. The final step entails the usage of the code in order to reproduce our results as well as get new results of your own.
If you use the code in your own work, please refer correctly to our paper.
	@article{ kelchter2017doshico,
		title={DoShiCo: Domain Shift challenge for Control},
		author={Kelchtermans, Klaas and Tuytelaars, Tinne},
		arxivid={1710.09860},
		year={2017}}
1. Get the Ros_Gazebo_Tensorflow Image
DoShiCo requires a combination of ROS (kinetic), Gazebo (7) and Tensorflow-gpu (1.11) with nvidia (CUDA >=8.0). Installing ROS is most convenient on a Ubuntu (16.4) operating system. The full installation can be tedious. Therefore we supply a docker image with all four requirements that can easily be pulled from the dockerhub page. The docker image can be used with docker or with singularity. The advantage of using docker, is that you can modify the image yourself though it requires root access to your computer. The advantage of using singularity is that it does not require nvidia-docker. Singularity can access the GPU with the –nv option from version 2.3<.
Note: The docker image has Xpra installed. This makes it possible to run applications without using a graphical session. The latter is especially suited in combination with a computing cluster where graphical sessions are often not allowed. Instructions on running the image with xpra is left out of this page for readibility.
Using Docker
The next steps explain the installation using docker. You’ll have to have docker installed and running. We also assume you have an nvidia GPU available with drivers installed as well as nvidia-docker. We also provide a troubleshoot page with more instructions on the installation of the prerequisits.
Once the prerequisites (docker, nvidia and nvidia-docker) are fullfilled, you can use a local version of the image with the following scripts. Please read the script files before running as some environment variables might be system dependent.
- Copy the following scripts in a local directory.
- Run the script the
build.shscript in order to create a doshico_image.- (Optional) Use the
run.sh,save.shandtest.sh 0to play around with the image and container if you’re not used to docker. In case you encounter a problem, you might find the solution here. If not, feel free to contact me.
Using Singularity
- Install Singularity with these instructions.
- Pull the docker image and run a shell:
singularity shell --nv docker://kkelchte/ros_gazebo_tensorflow
2. Install ROS- and Tensorflow-packages
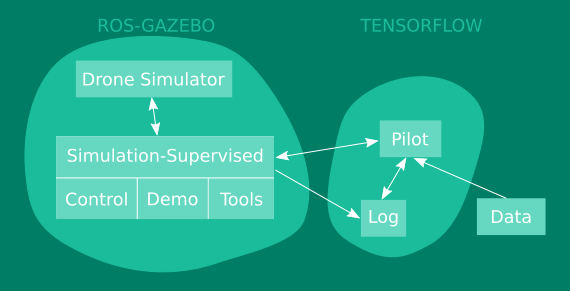
If all big software packages (ROS, Gazebo, Tensorflow) are installed or accessible in a docker image, it is now time to clone the local ROS- and Tensorflow-packages for flying the drone with a DNN policy. As we want you to easily adjust the packages, we did not include the code in the docker image. The structure of the packages are depicted bellow. The arrows indicate dependencies.
- Drone Simulator is a simulated version of the bebop 2 drone based on the Hector quadrotor package.
- Simulated-Supervised is a ROS package forming the interface between the simulated drone and the DNN policy.
- Pilot represents the code block for training the DNN policy in an online or offline fashion with tensorflow.
- Log folder with checkpoints:
- imagenet-pretrained mobilenet 0.25
- doshico-pretrained NAUX
- doshico-pretrained AUXD
- The data consists of 3 sets:
- Canyon_forest_sandbox with data collected by the expert in the training environments (canyon, forest, sandbox).
- ESAT with data collected by the expert in the validation environment (ESAT).
- The Almost-Collision dataset with data collected by hand in the real world of almost collisions imposing only one correct action.
The download of the packages as well as adjusting the paths is performed by two scripts:
3. The Challenge
The DoShiCo challenge focusses on dealing with the domain shift when training a policy in basic environments and see if it adapts to more realistic and real-world environments. The goal is to perform monocular collision avoidance with a UAV over 1 direction.
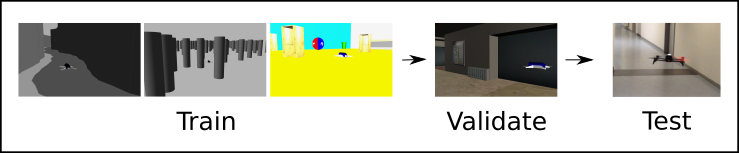
The policy has to be based solely in monocular RGB input. The training happens in three types of basic simulated environments: Canyon, Forest and Sandbox. The environments are generated on the fly at random. The training procedure is left open: online/offline, reinforcement or imitation learning, … .
Validate the policy online in a more realistic ESAT corridor. The performance is measured in average flying distance in the 2 directions of the corridor while flying at a constant speed of 0.8m/s.
Test the policy offline on the Almost-Collision dataset. Comparing performances in the real-world is hard due to many external factors (battery state, wind turbulences,…). The Almost-Collision dataset contains small trajectories capturing very near collisions that can only be avoided with the correct action. The performance should be measured as accuracies. The continuous control in yaw is discretized with thresholds ±0.3 for left, straight and right.
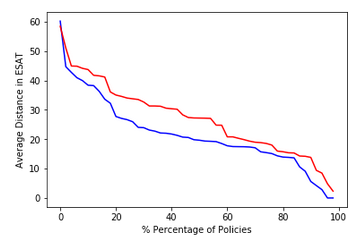
The large variance that comes along with training deep neural network policies makes it hard to compare different methods. We strongly recommend to include a graph similar to the image below. It depicts the performance over the percentage of policies reaching this performance.
| Flying Distance (m) |
NAUX | AUXD |
|---|---|---|
| Canyon | 43.96 | 38.41 |
| Forest | 45.99 | 50.24 |
| Sandbox | 7.03 | 8.62 |
| ESAT | 47.03 | 57.63 |
Our results, as demonstrated in our paper, can be used as a benchmark. The values present the average over the top 10% policies trained from 50 trained policies. You can use the test scripts within the pilot package to reproduce these numbers or improve on them.
| Almost-Collision Accuracies |
AUXD |
|---|---|
| ESAT real | 64 |
| Corridor 1 | 67 |
| Corridor 2 | 35 |
| Office | 52 |
| Cafeteria | 25 |
| Garage | 61 |
| Night | 63 |
| Avg. Loc. | 52 |
If you have any questions regarding the code or installation, feel free to contact me. Goodluck!